Dec . 01, 2024 01:36 Back to list
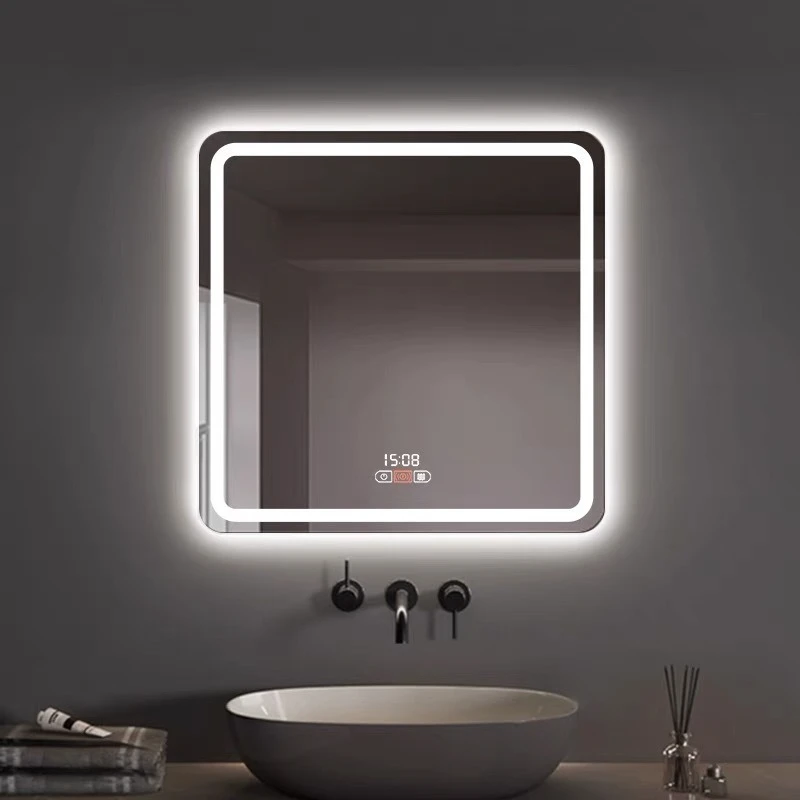
DIY illuminated wall-mounted makeup mirror for a stylish vanity setup
Creating a Hanging Makeup Mirror with Lights A Chic Addition to Your Beauty Routine
In the world of beauty and skincare, a well-lit mirror is essential for achieving that flawless look. Enter the hanging makeup mirror with lights—a stylish and practical solution that combines functionality with elegance. This article will guide you through the process of creating your own hanging makeup mirror with lights, enhancing both your beauty routine and your room's decor.
Choosing the Right Mirror
The first step in crafting your hanging makeup mirror is selecting the right mirror. Look for a round or rectangular mirror that fits your personal aesthetic and space. A larger mirror is ideal for full-face applications, while a smaller one can be great for contouring and detailed work. You can choose a simple, frameless design, or opt for a mirror with an ornate frame that adds a touch of glamour to your space.
Selecting the Lighting
Next, consider the lighting. LED lights are a popular choice for makeup mirrors, providing bright, consistent illumination without generating excessive heat. You can either buy LED strip lights or individual bulbs, depending on your preference. Soft white lights are generally recommended for makeup application, as they mimic natural daylight, allowing you to see your true colors and avoid makeup mishaps.
Assembling the Components
To create your hanging makeup mirror with lights, you’ll need a few essential materials
- A mirror - LED strip lights or bulbs - A sturdy hanging mechanism (such as command hooks or a wall-mounted shelf) - A power source (preferably a nearby outlet) - Optional paint or decor for the mirror frame
hanging makeup mirror with lights

Start by deciding on the placement of your mirror. Ideally, it should be mounted at eye level for optimal use. Once you’ve marked the spot, install your hanging mechanism securely.
Attaching the Lights
Now, it’s time to attach the lights. If you’re using LED strip lights, peel off the adhesive backing and carefully stick the strips around the perimeter of the mirror. Ensure that the lights are evenly spaced for a balanced glow. If you’ve chosen individual bulbs, you may need additional hardware to mount the bulbs around the mirror. Consider using a dimmer switch to control the brightness, allowing you to adjust the light depending on your needs.
Final Touches
Once the lights are set up, step back and admire your handiwork! You might want to personalize your mirror further. Apply a coat of paint to the frame or add some decorative elements like small shelves for your favorite beauty products or accessories.
Maintenance and Usage
To keep your mirror and lights in top condition, regularly clean the mirror surface and dust the lights. When applying makeup, sit in front of the mirror in good light to ensure even application. Enjoy experimenting with various makeup looks, all while benefiting from the flattering illumination of your custom hanging makeup mirror with lights.
Conclusion
Creating a hanging makeup mirror with lights is an exciting DIY project that not only enhances your beauty routine but also serves as a stunning decor piece in your room. With careful selection of your materials and proper installation, you can enjoy the perfect blend of style and practicality, making your makeup application experience more enjoyable and efficient. So gather your materials and make a statement with your very own artistic and functional mirror today!
-
Safety and Style with Premium Laminated Glass Solutions
NewsJun.24,2025
-
Reinvents Security with Premium Wired Glass
NewsJun.24,2025
-
Premium Float Glass Line for Modern Architecture
NewsJun.24,2025
-
Low Emissivity Glass for Energy-Efficient Architecture
NewsJun.24,2025
-
High-Performance Insulated Glass Solutions for Modern Architecture
NewsJun.24,2025
-
Elevates Interior Style with Premium Silver Mirror
NewsJun.24,2025
Related PRODUCTS